[Qiita] Android NのDirectReplyを実装してみた
※この記事は以前Qiitaに投稿されていた古い記事です
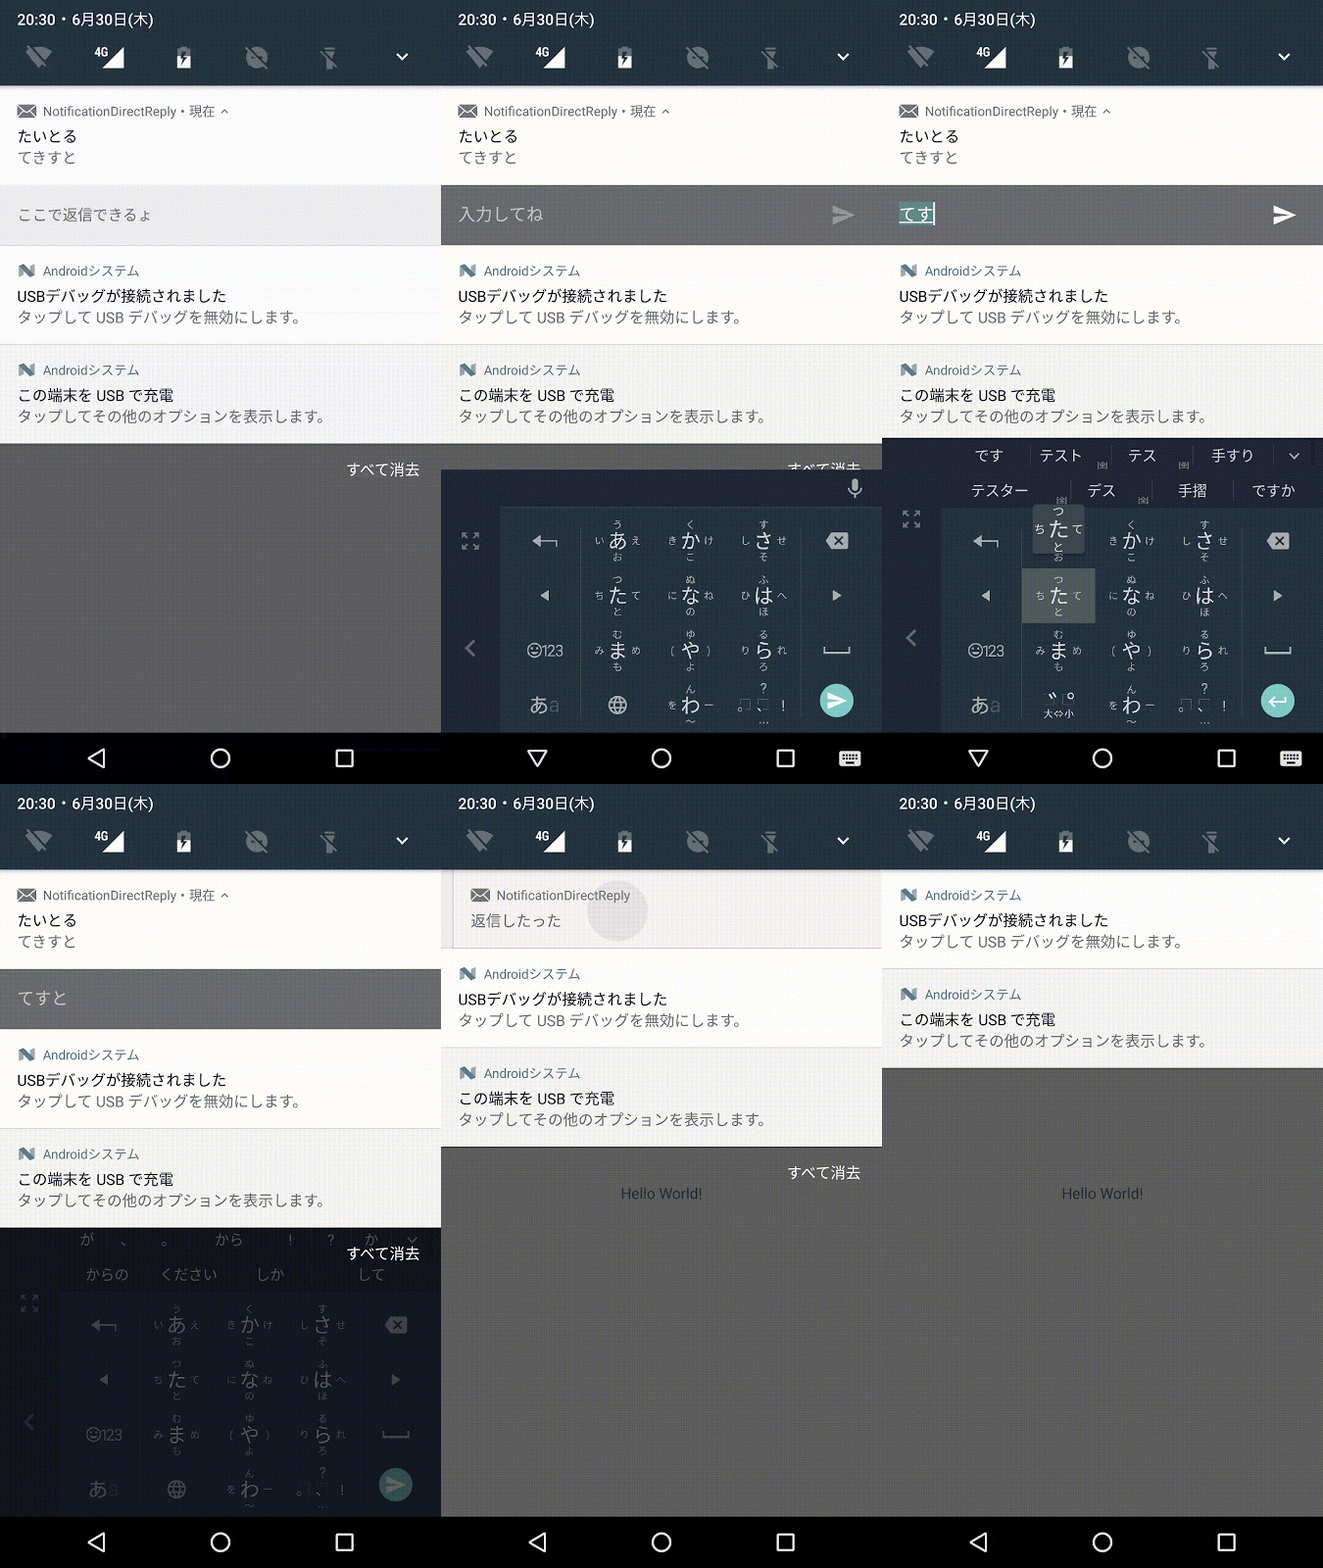
まず完成形はこんな感じです。

getCharSequenceで指定しているKEYは、通知時に作成したRemoteInput.Builderの引数に渡したKEYと一致している必要があります。

Direct Replyで入力された内容はIntentの中に入るので、ServiceでもActivityでもBroadcastReceiverでも良いのですが、今回はBroadcastReceiverで通知を受け取ってみました。
みなさんもぜひ実装してみてください!
はじめに
Android NのDirect Replyの実装を試してみました。まず完成形はこんな感じです。

通知する
Direct Replyができる通知を作成するには、入力された内容を受け取るためのPendingIntentと、実際に文字を入力させるためのRemoteInputを作成し、それをActionに詰めて通知してあげると、Direct Replyとして通知してあげることができます。// 入力されたテキストを受け取るPendingIntent
PendingIntent replyPendingIntent = PendingIntent.getBroadcast(this, 0, new Intent(this, NotificationReceiver.class), 0);
// DirectReplyの入力欄のヒントテキスト
String replyLabel = "入力してね";
// 入力を受け取るやつ
RemoteInput remoteInput = new RemoteInput.Builder(KEY_TEXT_REPLY)
.setLabel(replyLabel)
.build();
NotificationCompat.Action action = new NotificationCompat.Action.Builder(android.R.drawable.ic_menu_send,
"ここで返信できるょ", replyPendingIntent)
.addRemoteInput(remoteInput)
.build();
Notification newMessageNotification =
new NotificationCompat.Builder(this)
.setSmallIcon(android.R.drawable.ic_dialog_email)
.setContentTitle("たいとる")
.setContentText("てきすと")
.addAction(action).build();
NotificationManagerCompat notificationManager = NotificationManagerCompat.from(this);
notificationManager.notify(0, newMessageNotification);
Direct Replyを受け取る
Direct Replyで入力された内容はこんな感じで取得することができます。getCharSequenceで指定しているKEYは、通知時に作成したRemoteInput.Builderの引数に渡したKEYと一致している必要があります。
private CharSequence getMessageText(Intent intent) {
    Bundle remoteInput = RemoteInput.getResultsFromIntent(intent);
    if (remoteInput != null) {
        return remoteInput.getCharSequence(KEY_TEXT_REPLY);
    }
    return null;
}
private void repliedNotification(Context context, String reply_text) {
    Notification repliedNotification =
            new Notification.Builder(context)
                    .setSmallIcon(android.R.drawable.ic_dialog_email)
                    .setContentText(reply_text)
                    .build();

    NotificationManagerCompat notificationManager =
            NotificationManagerCompat.from(context);
    notificationManager.notify(0, repliedNotification);
}

Direct Replyで入力された内容はIntentの中に入るので、ServiceでもActivityでもBroadcastReceiverでも良いのですが、今回はBroadcastReceiverで通知を受け取ってみました。
public class NotificationReceiver extends BroadcastReceiver {
    private static final String KEY_TEXT_REPLY = "key_text_reply";

    @Override
    public void onReceive(Context context, Intent intent) {
        CharSequence messageText = getMessageText(intent);

        if (messageText != null) {
            Log.v("test", messageText.toString());
            repliedNotification(context, "返信したった");
        } else {
            Log.v("test", "No message.");
            repliedNotification(context, "失敗した");
        }

    }
}
おわりに
思ったより簡単に実装することができました。みなさんもぜひ実装してみてください!
参考
通知 | Android Developers
https://developer.android.com/preview/features/notification-updates.html?hl=ja


コメント
コメントを投稿